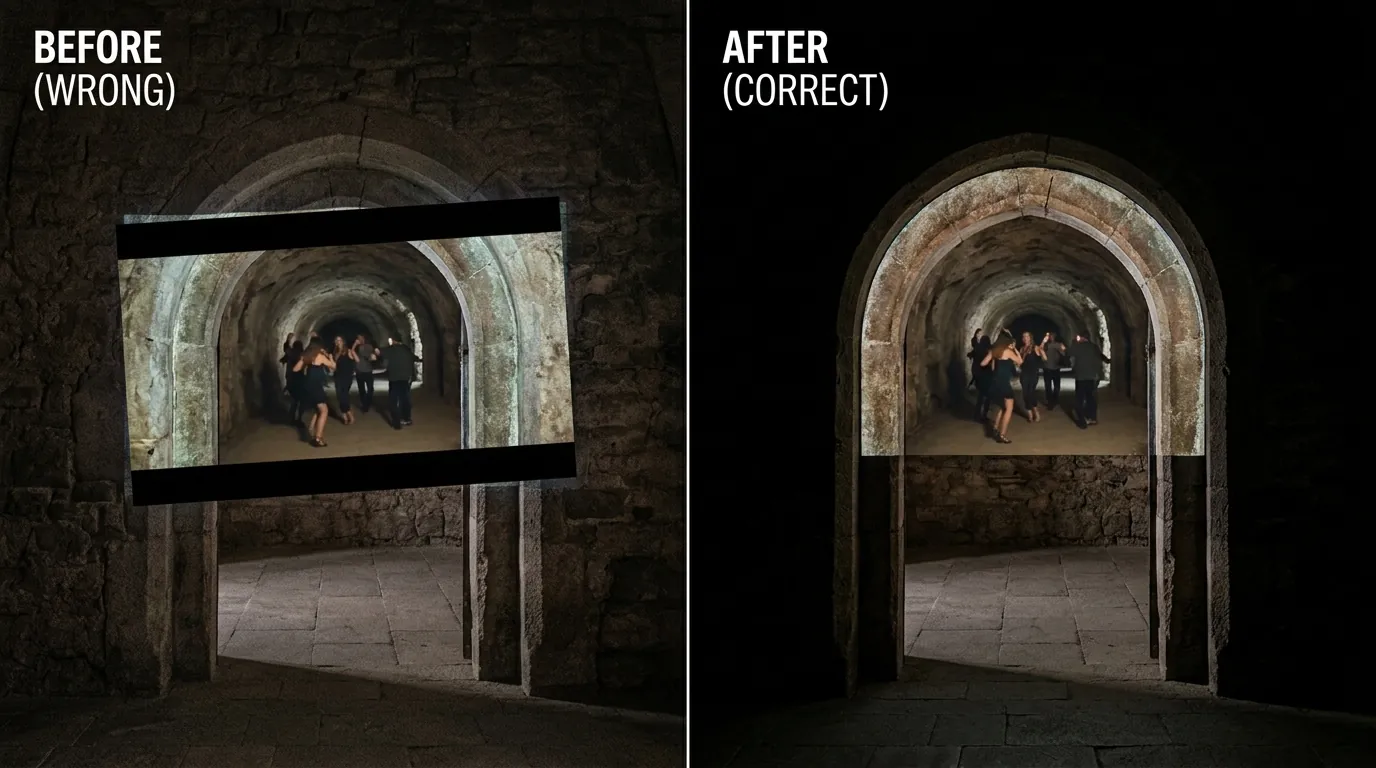
What Screen Mirroring Actually Does
Screen mirroring sends a live copy of your device's whole display to another screen. Casting is looser: it covers mirroring and also the hand-off kind, where you pass one specific video to the other device and it fetches and plays it itself — which is why casting a YouTube clip leaves your phone free. Either way you get a rectangle, and that rectangle behaves in three ways beginners do not expect.
It keeps your phone's shape, so a tall 9:16 display sent to a 16:9 projector arrives letterboxed or squeezed. It sends everything, notification banners and low-battery warnings included. And it is a real-time copy, so it carries whatever delay the connection adds. None of that is a bug; it is the job mirroring was built to do.
The rectangle also lands wherever the lens points. A projector sitting low or off to one side throws a trapezoid. Keystone correction, in the projector's own menu, squares that back up — but it squares the whole picture as one block. It cannot make the image stop at the edge of a doorway, and it cannot bend to follow a curve.
The four wireless systems, and which one you have
The names are mostly brands over a handful of standards, and your device supports at least one:
- Google Cast — what a Chromecast speaks. Built into Android, Chrome and many TVs and sticks, and it does both mirroring and the hand-off kind.
- Miracast — device-to-device, so the two ends can talk without a Wi-Fi router. This is what Windows means by "wireless display".
- Smart View — Samsung's name for its own casting and mirroring on Galaxy phones and tablets.
- AirPlay — Apple's version, from an iPhone, iPad or Mac to an Apple TV or an AirPlay-capable display.
Beginners are rarely told the important part: most projectors receive none of these on their own. Unless the box advertises built-in AirPlay, Chromecast or a smart TV system, your phone is talking to a streaming stick in the projector's HDMI socket, not to the projector. If wireless "isn't working", check there is something on the other end capable of listening.
What Projection Mapping Does Instead
Projection mapping — you will also see it called screen mapping software, or video mapping — starts from the opposite end. Instead of copying a screen, you tell the software the shape of the real object and it pours the picture into that shape. Three ideas do most of the work.
A surface is a region you draw over the live preview to stand in for a piece of the real world. Tap Add Surface and a rectangle with four corner dots appears; drag each dot onto a real corner of the object — the top-left of the window frame, the bottom-right of the door. That gesture, corner pinning, does keystone correction's job per object rather than per projector, which is why a mapped image sits dead straight on a window while the projector stays put. Dragged corners snap magnetically onto a neighbouring surface's corner, so two panels meet without a seam.
Warping handles what corner pinning cannot: curves. Turn the WARP toggle on for a selected surface and each of its four straight edges becomes a bendable curve. Double-tap a corner and two orange tangent handles appear; drag them and the adjacent edge bows until it hugs a pillar, an arch or a car door. Nothing moves until you drag — switching WARP on only arms the tool.
Masking is what makes the result read as an object glowing rather than a projector shining. Anything outside your surfaces is projected black, so no grey letterbox bleeds onto the brickwork. For shapes four corners cannot describe, Pick Custom Mask reads the light and dark areas of an image you supply and cuts the surface to that stencil, with a Threshold slider and an Invert toggle. The beginner's guide to digital mapping covers the same vocabulary at a slower pace.
The consequence people miss: a mapping app never mirrors your phone. It treats the projector as a second, separate display and sends only its own composed output there, so your phone stays a control panel and your notifications stop appearing mid-show.
The Rectangle Problem, in Three Real Jobs
Abstractly the difference sounds academic. In practice it is the whole result.
- A shop window at night. Mirrored, your video covers the glass, the frame, part of the brick and a slice of pavement. Mapped, one surface is pinned to the glass and the rest stays black, so it reads from across the street as a lit window rather than a projector aimed at a shop.
- A pumpkin on a porch. A face video mirrored onto a pumpkin is a flat rectangle draped over a sphere; the features slide off the sides. Mapped and warped, the eyes stay in the eye holes.
- Three columns across a hall. Mirroring spreads one picture over three columns and the dark gaps between them. Mapping gives you three surfaces, each carrying its own slice of one continuous clip.
None of those fail because the app is weak. They fail because mirroring has no concept of "the wall has a shape". For what a phone can and cannot pull off, see projection mapping with a smartphone.
Getting the Picture Out: Cables First
A cable is the boring answer and the right one for anything that matters. It is steadier than any wireless link, it ignores the venue's Wi-Fi, and it adds no delay you can perceive.
Android and Windows: USB-C to HDMI, or plain HDMI from a laptop. One caveat wastes a lot of evenings — not every USB-C port carries video, and plenty of budget and mid-range phones do not, whichever adapter you buy. Check your model before ordering. The Android projection mapping guide goes through the options phone by phone.
iPhone and iPad: recent models use USB-C the same way; older Lightning devices need Apple's Lightning digital AV adapter. Either route gives you HDMI out, and the iPhone and iPad guide covers the adapter and AirPlay side in more detail.
Order matters, and it differs by platform. On macOS, Windows and iOS, connect the projector before opening the app. On Android you can hot-plug whenever you like and the output jumps across in about a second. In SurfaBeam the Project Box is the status light: it turns green when a display is detected and its status line reads back what it found — connected, extended, direct cable, and the resolution.
Output resolution matches the projector automatically, so there is no setting to get wrong, and if the projector is mounted on its side to fill a tall doorway, Portrait Projection Mode rotates the projected image to 9:16 while your controls stay landscape. Which projector you point at the wall matters more than most software choices — our notes on choosing a projector cover brightness and throw distance.
You do not need a projector to learn this
Everything previews on your device screen, and a built-in test mode can fake a connected projector so you can see the whole connected interface before you own any hardware. Install it, add a surface, drag the corners, and you will understand the difference in ten minutes.
Can I Do It Wireless?
Yes — with a caveat rather than a catch. SurfaBeam auto-detects wireless displays over Cast, Miracast, Smart View and AirPlay alongside cables, so if your phone can already throw a picture to a stick or an Apple TV on the projector, the app will find that display and use it.
One behaviour looks like a fault the first time. Wireless links are forced into extended mode rather than mirrored: an extended connection treats the projector as a second, separate screen the app addresses on its own. So connecting wirelessly will not put your phone's interface on the wall — you get only the mapped output, and the controls stay in your hand. That is the desired result.
The honest limit: latency
Latency is the delay between something happening on your device and it appearing on the wall. Over a cable it is imperceptible. Over any wireless link it is not: the picture has to be encoded, sent over the air and decoded at the other end, and how long that takes depends on the standard, the receiver and how congested the local Wi-Fi is. A quiet flat and a busy venue behave very differently, and the busy venue is where you will be.
Wireless is fine for a looping decorative clip, ambient visuals at a party, a static image in a window, and all of your setup and rehearsal. It lets you down on anything the audience can time against: effects that follow a hand drift behind the person making them, and content cut to music falls out of step with the speakers. For a live show, run a cable and keep wireless as the fallback — the SurfaBeam user guide says the same thing for the same reason.
When Mirroring Is the Right Answer
Often it is, and a mapping app would be the wrong tool. If your surface is a flat, plain, roughly rectangular wall or a proper screen, and you want a film, a slideshow, holiday photos or a presentation — mirror or cast it and stop reading. You get sound, playback controls in the app you already use, and nothing to set up. Mapping software there is extra work to arrive at the same rectangle.
Two more cases belong to mirroring. If the thing you want on the wall is your phone's screen — demonstrating an app, showing a spreadsheet, teaching someone where a setting lives — a mapping app cannot help, because it deliberately sends its own output instead of a copy of your display. And protected video from paid streaming services often refuses to mirror at all and shows a black frame; a streaming stick in the projector's HDMI port sidesteps that, and no mapping software changes it.
Reach for mapping when the surface has a shape you care about, when light must stay off the parts around it, when several objects need one continuous image, or when the projection should react to a person in front of it. If you are still deciding whether a phone is the right machine at all, desktop versus mobile projection mapping lays out the trade honestly.
Your First Map, in About Twenty Minutes
The whole discipline rests on one short loop. Learn it on something forgiving — a cardboard box, a door, a picture frame — before anything is at stake.
- Connect and confirm. Cable or wireless, then check the Project Box is green and the display count reads 2.
- Add a surface, then drag its corners onto the real object. This is the entire skill, and everything after it is quick. To move the whole surface rather than one corner, hold still for a moment first — sliding immediately pans the canvas instead.
- Apply media. Turn Video Select Mode on, tap the surface, then Apply Video or Apply Image. The clip fills the shape and loops; Fit cycles between stretch, contain and cover if the framing is off.
- Warp only if you need it. Flat object, skip it. Curved object, toggle WARP on, double-tap a corner, and drag the orange handles until the edge follows the curve.
- Judge it from the wall, not the preview. Step back to where your audience will stand and look at the edges. Then use Capture still image, which saves a photo of the projection — worth doing to record where the projector stood.
On free versus paid, so there are no surprises: SurfaBeam's free tier is permanently free and includes the full mapping, media, effects, tracking, visualizer and Timeline toolset. It watermarks both the projected image and any exported video, and an entry gate meets you before mapping — on Android, a rewarded ad for a ten-minute unlock or four ads for the whole session. Saving, loading and exporting project files are Pro, sold as a subscription or a one-time Lifetime purchase on the App Store and Google Play, and as a one-time DLC on Steam. Who charges what across the category sits in our comparison of the best projection mapping apps for 2026.
Common Questions
Can you project an image from your phone?
Yes, in two senses. You can mirror your phone's screen over a cable or wirelessly, which puts a copy of your display on the wall as a rectangle. Or you can run a projection mapping app, which uses the projector as a second display and sends a composition shaped to fit the object you are lighting.
What is the difference between screen mirroring and screen mapping?
Mirroring copies your display unchanged, as a rectangle in your device's aspect ratio. Mapping reshapes the image to fit a real surface: pin the corners to the object's corners, bend the edges if it curves, and everything outside those surfaces is projected black.
Will my notifications show up on the wall?
If you are mirroring, yes — everything on your screen goes out, which is why do-not-disturb is worth turning on first. With a mapping app, no: the projector receives only the mapped output, so your interface and your banners stay on the phone.
Do I need a smart projector or a special app on the projector?
No. Over a cable the projector only needs an HDMI input. For wireless you need something on the other end that speaks Cast, Miracast, Smart View or AirPlay — built into the projector, or a streaming stick or Apple TV in its HDMI port. The mapping software runs on your device, not on the projector.
Which is better on Android — Smart View, Miracast or a cable?
A cable, whenever the option exists. Smart View and Miracast are fine for setup, testing and ambient loops, but both add latency that varies with the room's Wi-Fi. USB-C to HDMI also hot-plugs on Android, so you can connect after the app is open.
More questions of this kind are answered in the projection mapping FAQ, and new walkthroughs land regularly on the SurfaBeam blog.
Related reading
- A beginner's guide to digital mapping — the vocabulary, slowly, with examples.
- Projection mapping with a smartphone — what a phone can and cannot do.
- Best projection mapping apps 2026 — the categories and how to choose.
- Choosing a projector — brightness, throw distance and what actually matters.
Stop throwing a rectangle at the wall
SurfaBeam runs on Android, iOS, macOS and Windows with the same mapping, warping, masking, tracking and effects toolset on each, over a cable or over Cast, Miracast, Smart View and AirPlay. The free tier is permanently free and includes the full toolset, so you can pin your first surface tonight.