Three Rungs of the Same Ladder
Warping means reshaping the projected picture so it lands where you want it rather than where the optics happen to throw it. There are three levels of it, they solve different problems, and they cost different amounts of picture quality. Work out which one your surface needs before you start dragging anything.
Rung one: the keystone correction inside the projector
Every projector with digital keystone does the same thing. It pre-distorts the image on the way out so that an off-axis throw lands as a rectangle instead of a trapezoid. It is free, it lives on the remote, and for a slide deck in a meeting room it is entirely fine.
It costs you two things. The first is resolution. The panel inside the projector has a fixed pixel count; squaring the image means shrinking part of it and resampling everything, so fine detail and small text soften, diagonal lines pick up stair-stepping, and the more correction you dial in the worse it gets. The second is reach: keystone corrects a trapezoid on a flat surface. Some projectors extend this to a four-corner adjustment, which is genuinely more useful, but the assumption underneath never changes — the surface is a plane.
So the first rule of warping is to use as little of it as possible. Move the projector. Use optical lens shift if the model has it, because lens shift moves the image without resampling a single pixel and is the one free correction in the chain. Our guide to choosing a projector for mapping covers throw ratio and lens shift in more depth, and both matter more than any slider.
Rung two: four-corner pinning in mapping software
Corner pinning is the same idea as keystone, moved into the content pipeline. The difference is that you can see the surface while you do it, and — this is the part that matters — you can do it per surface rather than once for the whole output.
In SurfaBeam, every surface starts life as a four-corner quad with a dot at each corner. You drag each dot onto the real corner of the thing you are projecting onto, and the picture stretches to fit. Corner positions are stored with the project, so the same map re-projects at whatever size the surface is next time. One gesture is worth learning early: to move a whole surface you have to hold still for about a third of a second before you drag, otherwise the app reads it as a pan of the canvas.
Per-surface is the reason software beats the remote here. A shop window with three glass panels at slightly different angles, or two walls meeting at an interior corner, is not one trapezoid — it is three or four of them. A projector's keystone can square exactly one and will make the rest worse. Four separate corner-pinned surfaces get all of them, from one projector, with nothing baked into the panel.
Rung three: curved-edge warping
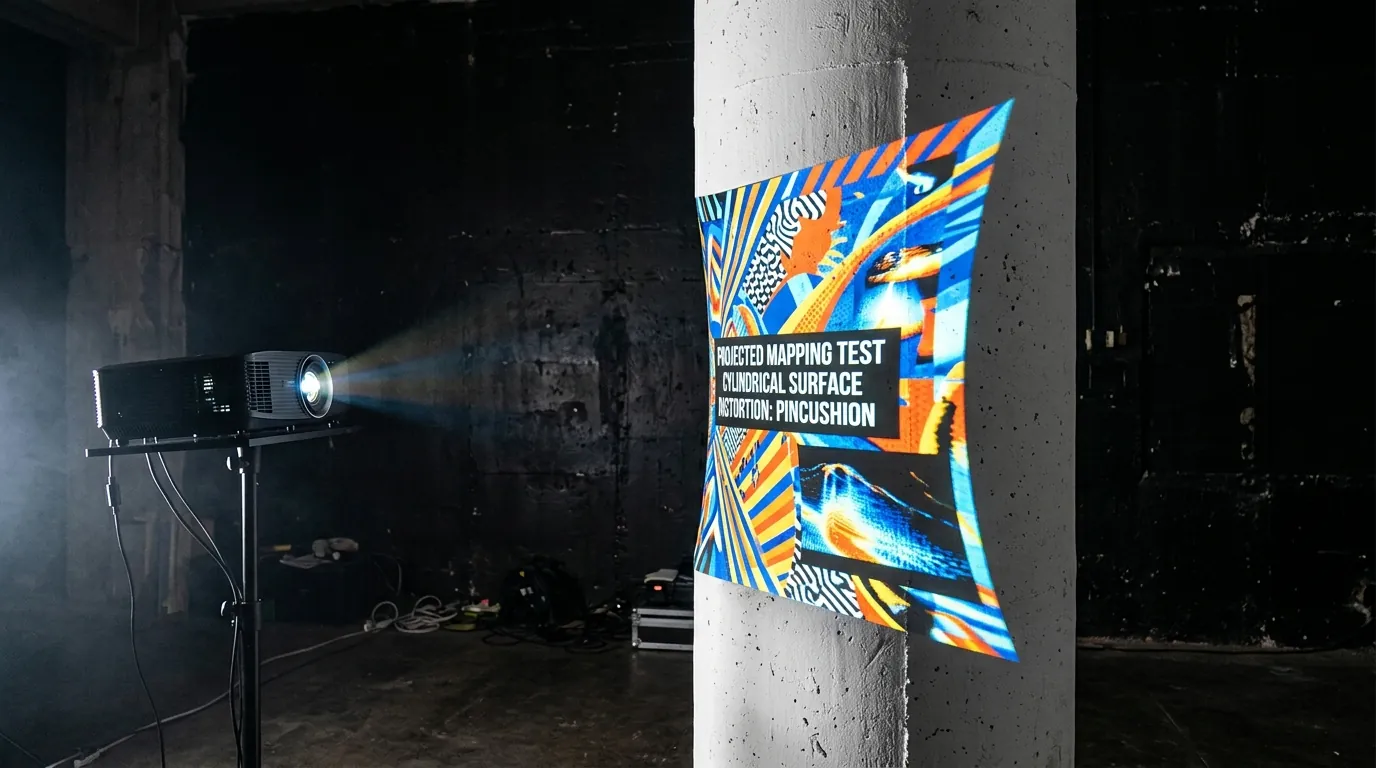
Corner pinning runs out the moment the surface stops being flat. Four straight lines cannot follow a cylinder. Put a corner-pinned rectangle on a pillar and you get a picture that reads correctly down the centre and slides off both sides — content creeping past the edge at the top, dark stone showing at the bottom. Nudging the corners chases the problem around without solving it, because the error is in the middle of the edge, not at its ends.
This is what the WARP toggle is for. Turning it on lets each of the surface's four straight edges become a Bezier curve you can bow into shape. Here is the sequence exactly as it happens on screen:
- Select the surface first. With nothing selected, WARP just flashes a warning and does nothing.
- Tap WARP. It turns green. Nothing about the picture changes — that is expected. The toggle simply takes the current shape as its starting pose.
- Double-tap a corner. Two orange tangent handles appear on that node, one for each edge meeting there. Double-tap again to tidy them away.
- Drag an orange handle. The adjacent edge bows. Pull it farther for a stronger curve; once you have dragged it, that curve stays put.
- Repeat at the other corners until each edge hugs the object, then hide the handles and move on.
Two colours, two jobs, and mixing them up is the most common beginner mistake: corner dots reshape the whole surface, orange dots bend one edge. With warp on, dragging a corner stretches the surface like fabric and the handles you have not touched adjust themselves to keep the edges natural. Curves save with the project and survive undo, so experimenting is cheap.
It is worth saying plainly what this is not, because the distinction decides whether the tool suits your object. There is no interior mesh grid inside the shape — no lattice of points across the middle to nudge one at a time, no subdivision, no snap-to-grid. What you get is four corners, four curvable edges and two tangent handles per corner. On a cylinder, an arch, a curved wall or a rounded prop, bowed edges are the correct answer and the shortest route to it. On something that bends in two directions at once, they are not, and the next section is about that.
One exception to keep in your head: warp does not apply to spheres. A 3D sphere surface has its own shaping — position it, size it with Scale, spin it with Rotate so the media wraps — and the warp toggle skips it entirely. For a ball, a globe or a rounded head prop, that is the tool, not a warped quad. The 3D projection mapping guide covers where the illusion of depth actually comes from.
When one surface is not enough: node snapping
A single bowed quad covers a gentle curve well. Past roughly a quarter turn of a cylinder, or on a wall that changes radius partway along, you are better off splitting the object into two or three surfaces that meet.
That creates a new problem — the seam — and node snapping is the answer. With snapping on, a corner you drag magnetically latches onto a neighbouring surface's corner so the two edges line up exactly; drag out of range and it releases. Do it by eye instead and the seam shows at three metres as a hairline of black where the surfaces do not quite touch, or a strip of double brightness where they overlap. To an audience neither reads as a software mistake; it reads as a bad projector.
Try the warp on something round this week
SurfaBeam runs on macOS and Windows as well as Android and iOS, with the same corner pinning, edge warping, masking and effects on each. The free version is permanently free and includes the full mapping toolset, so you can judge the warp on a real pillar before spending anything. All routes are on the download page.
When You Genuinely Need a Desktop Tool With Mesh Warping
Edge warping is not the top of the ladder. Desktop suites subdivide the image into a grid and let you drag individual interior points, and there are jobs where that is not a nicety but the whole requirement. Three of them:
- Compound curves. A dome, a sculpted relief, a draped fabric backdrop, a vehicle body — anything bending in two directions at once. Bowed edges define the boundary and let the interior interpolate between them; they cannot pull a point in the middle of the surface out of that interpolation. If the middle of your object needs its own correction, you need interior control points.
- Multi-projector edge blending. Two or more projectors overlapping into one continuous image need soft-edge blending, per-projector warp and usually a media server. SurfaBeam is single-output and does not attempt this; a facade with four blended machines belongs on a desktop rig with an operator.
- Live texture input. If your content is generated in real time by another application and handed over via Syphon, Spout or NDI rather than rendered to a file first, that connection is your workflow and it rules out the lightweight category outright.
If any of that describes your next three jobs, buy the desktop suite and do not look back. We compare that category honestly in the MadMapper alternatives piece, and the wider map of who should use what is in our comparison of the best projection mapping apps for 2026. The trade runs the other way too, as desktop versus mobile mapping sets out: a desktop tool keeps you at a laptop, walking back and forth to check every adjustment, and on an irregular object that walk is most of your setup time.
A Setup Order That Saves You an Hour
The order matters more than the tool. Corrections compound, and a correction applied at the wrong stage has to be undone at the right one.
- Zero the projector's own keystone first. If you leave a hardware correction in place and map on top of it, you are mapping onto a picture that has already been resampled once, and you never get that sharpness back.
- Fix it with physics before software. Move the projector, raise it, use lens shift. Every degree you fix by placement is a degree you do not pay for in pixels.
- Corner-pin the flat planes with warp off. Get all four corners exactly on the real edges of the object first. Warping a surface whose corners are wrong just distributes the error.
- Then turn WARP on, one surface at a time. Because the toggle changes nothing until you drag something, you never lose the corner work you just did — flick it on, bend the edges that need bending, leave the rest.
- Judge from where the audience will stand. A warp tuned from beside the projector can be visibly wrong from the doorway. Walk to the viewing position before you call it finished.
- Capture a still image of the projection when it is right. It saves a photo of the result to your Photos, Gallery or disk, it is not locked behind Pro, and it records what the calibrated state looked like.
One thing you do not have to think about: output resolution. For live projection SurfaBeam matches the projector automatically — there is no manual output-resolution control to get wrong. The SurfaBeam user guide documents every button and gesture named above.
What the Warping Costs — Free Tier and Pro
Behind most "free version" questions sits a single worry: is the warp itself crippled? It is not. SurfaBeam's free version is permanently free and includes the full mapping toolset — surfaces, corner pinning, edge warping, node snapping, masking, media, effects, tracking, visualizers and the Timeline. What it does instead is put a small watermark on both the projected image and any exported video, and show an entry gate before you start mapping. Saving, loading and video export are Pro.
For warping specifically, that last point is the one to weigh. A careful warp on an awkward object is thirty to sixty minutes of work, and in the free version you cannot save it — close the app and you build it again. If you are warping the same pillar every Friday, that arithmetic makes itself. Pro is sold as Monthly, Quarterly and Yearly plans plus a one-time Lifetime purchase through the App Store and Google Play; on Steam it is a one-time DLC instead. Our roundup of free projection mapping software puts that against what the open-source desktop tools give you for nothing.
On moving work between machines: there is no cloud sync, so nothing travels on its own. Pro's Save to Files writes a portable Scene_<date>.json that Load from Files reopens on another device — a warp built on an iPad opens on the Windows machine that will run the show. The catch is that media are stored as links rather than embedded, so copy the video and image files across too, or the surfaces come back with their shapes intact and nothing playing in them.
Three Questions That Come Up Every Time
Is keystone correction the same as warping?
It is the simplest form of it. Keystone corrects one trapezoid on one flat plane, applies to the entire output, and happens inside the projector where it costs you resolution. Software warping works per surface, on top of an uncorrected picture, and goes further than a trapezoid. Use keystone when the projector is the only tool in the room and the wall is flat; use mapping software the moment there is more than one plane or any curve.
Can free software handle a genuinely curved wall?
Yes, if it does real edge warping rather than corner pinning with a nicer interface. That is the one test worth running before you commit: put a cylinder in front of the projector — a bin, a pillar, a rolled sheet of card — and see whether you can bow the sides of the image or only move its four corners. Plenty of apps that advertise warping only do the latter. SurfaBeam's free tier includes the real thing, watermarked; the free desktop tools generally do too, in exchange for a steeper interface and forum-only support.
Can I do this from a phone or tablet?
Yes, and for curved objects it is often the faster way to work, because the slow part of warping is not the dragging — it is the walk back to the laptop to see what the drag did. Holding the controls next to the surface collapses that loop. Cables and wireless output routes are covered in the smartphone projection mapping guide. Whichever device you use, build the map on the machine that will run the show, or move the scene file and its media across deliberately.
Related reading
- Best projection mapping apps 2026 — the four categories and how to pick between them.
- Choosing a projector for mapping — throw ratio, lumens and lens shift.
- 3D projection mapping software — what actually creates the illusion of depth.
- Free projection mapping software — what you really get without paying.
Find a pillar and bend an edge
Half an hour with a projector, a round object and a real warp tool teaches you more than any comparison table. SurfaBeam installs on macOS, Windows, Android and iOS with the same corner pinning and Bezier edge warping on each, and the free version is permanently free so you can judge the result before deciding anything.