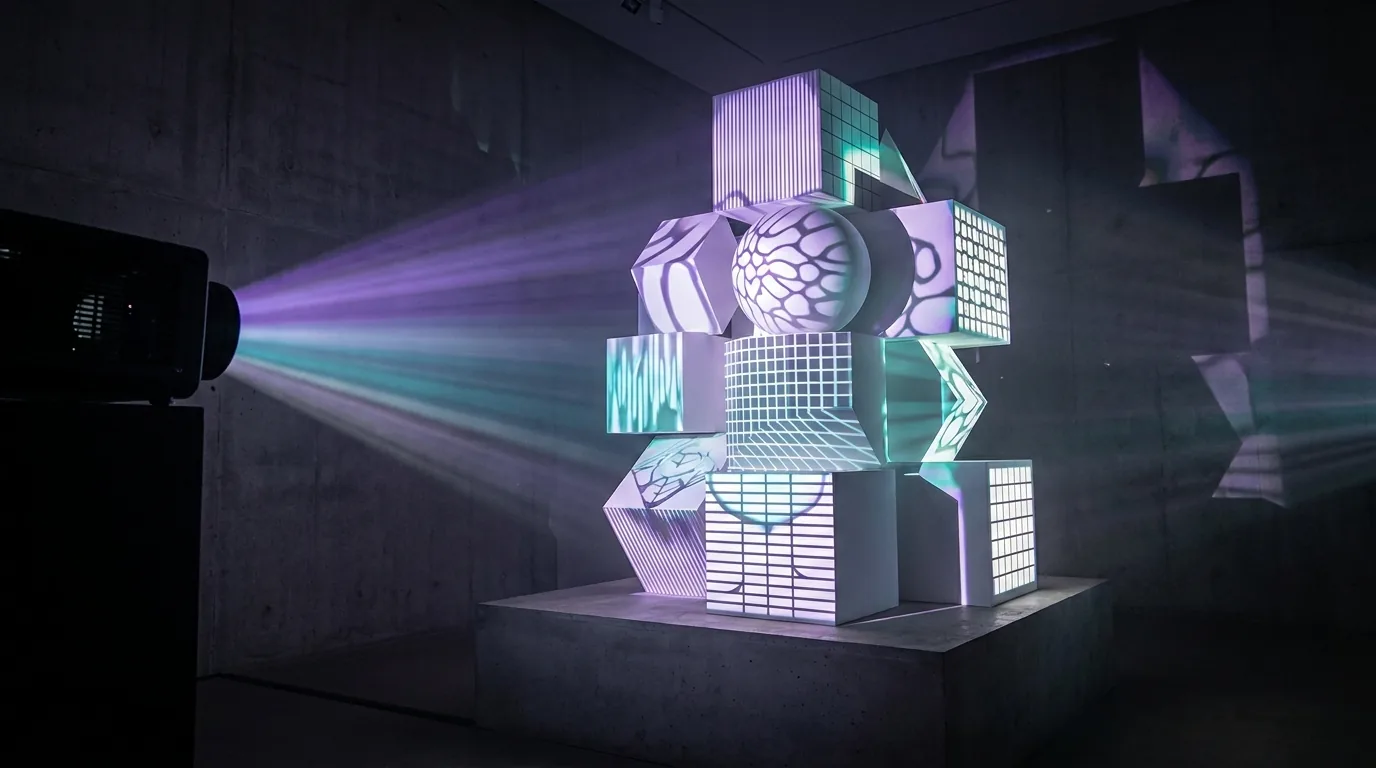
What "3D Projection Mapping Software" Actually Means
The term is used loosely, and that looseness is the real problem for anyone shopping. When someone types 3D mapping projector software into a search box, they could mean any of three things, and only one of them changes which product you should buy.
The three things people mean by "3D"
The surface is three-dimensional. A statue, a car, a stack of crates, a mannequin, a set of angled panels. The content is still a flat video; the software's job is to cut that video into pieces that fit each visible face. This is by far the most common case.
The content looks three-dimensional. Forced perspective, anamorphic illusions, walls that appear to crumble inward. All of this is authored in a 3D application and delivered as ordinary 2D video. The mapping software never knows it is showing depth — it just plays a file.
The pipeline is three-dimensional. Here the software genuinely holds a 3D model of the physical object, positions a virtual projector to match the real one, and renders each frame from that camera. This is the sense in which "3D" describes the tool itself, rather than the surface it is aimed at or the content playing on it.
Almost every problem people bring to us is the first kind wearing the label of the third. Sorting that out early saves buying a suite you will never learn or, worse, spending three days trying to hand-align something that needed a model.
Type A: Mapping Onto 3D Objects With 2D Warping
This is what mobile, tablet and lightweight desktop tools do well, and it is the correct answer for a surprising proportion of paid work: shop-window displays, product launches, stage set pieces, festival props, car reveals, holiday facades, museum objects.
How it works, face by face
You break the object into the faces the projector can actually see, and you build one independent surface per face. Each surface gets its own corner pin, its own mesh warp where the face curves, its own mask, and usually its own piece of content. A stack of three cubes seen from the front-left gives you six visible faces, so six surfaces. That is multi-surface mapping, and it is the feature that separates tools that can do object work from tools that can only warp one big rectangle.
The order matters more than the tool. Place and lock the projector first — every alignment you make is relative to its exact position, and a tripod that sags overnight invalidates the lot. Set the output to the projector's native panel resolution, usually 1920×1080. Then, per face: corner pin to the four visible corners, subdivide the mesh only where the surface genuinely bends, and mask last, because masks are drawn against the warped image and re-warping means redrawing them.
A 4×4 grid handles most gentle curves — a column, a car bonnet, a shoulder on a mannequin. Adding more control points feels like precision but usually makes the map harder to nudge later without introducing a ripple. If a face needs more than a 6×6 grid to sit correctly, the projector angle is probably the real problem.
Where this approach stops
Three honest limits. First, the illusion holds from a range of viewing positions, not from everywhere — anything you fake with perspective breaks down when a viewer walks around the object. Decide where the audience stands before you start, and calibrate from there. Second, there is no automatic occlusion: the software does not know that the front cube hides part of the back one, so you mask that by hand. Third, if the projector moves even slightly, you redo the alignment rather than adjusting one number.
None of that matters for a static object, one projector and a known viewing arc — which describes most of the work. It matters a great deal for the cases in the next section.
Type B: True 3D-Model-Driven Mapping
In this workflow the software is doing something categorically different. You import a mesh of the real object — OBJ, FBX or similar — and place a virtual projector inside the 3D scene with the same lens characteristics and position as the physical one. The software then renders the scene from that virtual camera, and because the virtual and real geometry agree, the rendered image lands correctly on the real object without face-by-face warping.
What it demands from you
An accurate model, first of all, and this is where projects fail. The model has to match what is physically in front of you to within a centimetre or two at the scale you are working. Sources in rough order of reliability: original CAD for a fabricated set piece, a laser or LiDAR survey of a building, photogrammetry from a careful photo pass, and — for simple forms — modelling by hand from tape-measure dimensions. A model that is close but not right looks convincingly wrong: every edge slightly soft, nothing quite landing, and no amount of nudging in the software rescues it, because the error lives in the geometry rather than the alignment.
Then a calibration step, because the software needs to know exactly where the projector sits relative to the model. The usual method is point correspondence: you identify a set of known points on the 3D model, project a marker for each, drag it until it sits on the matching real feature, and let the software solve for the projector's position, orientation and lens. Six to a dozen well-spread points, chosen at genuine corners rather than in the middle of a flat panel, will usually converge. Points clustered on one plane will not.
And a desktop machine with a real GPU. TouchDesigner is the usual entry point: it is node-based, holds a live 3D scene with virtual cameras, and has a long-established projector-calibration workflow, so you can assemble the whole render pipeline yourself — the trade-off being that you are building a system rather than opening a mapping app. MadMapper sits between the two categories and is genuinely strong at both: a fast, direct surface mapper that also accepts imported 3D models, which makes it the shortest step up from face-by-face work if that is where you are coming from. Above those sit the media servers — disguise, Dataton Watchout, Green Hippo Hippotizer and Christie Pandoras Box — which are built for production rather than for authoring: venue models and previsualisation, multi-projector blending, timecode, and the redundancy a show that has sold tickets needs. Large facade and touring work runs on these, and often for the operational side as much as the geometry.
Licensing differs by vendor and moves, so check current terms with each one rather than trusting a figure in a blog post. Broadly: TouchDesigner has long offered a free non-commercial licence alongside its paid tiers, MadMapper is sold as a paid licence, and media servers are as often rented for a specific job — frequently with an operator included — as bought outright.
What you get back
Content authored once in 3D that works across every face at once, including virtual lighting that wraps the real form. Consistency across multiple projectors, because they all reference the same model. Previsualisation — you can see roughly what the show will look like before the projector exists. And recoverability: move the projector, re-run the calibration, and the map comes back rather than being rebuilt.
This is the correct answer for a full building facade with blended projectors, a touring set that must be re-rigged nightly, a rotating object, or anything where a client signs off on a previsualisation. It is the wrong answer for a shop window on Thursday.
More in this series
- Projection mapping software: the full guide — the four categories of tool and how to choose between them.
- Projection mapping software for Windows — installer, Microsoft Store and Steam routes compared.
- Free projection mapping software — what you actually get without paying.
- The best mapping apps for iOS and Android — including where each one stops.
Which One Do You Actually Need?
Run through these. If you answer no to all of them, Type A is your workflow and you can stop shopping for a suite.
- More than one projector covering the same object? Two projectors hitting a statue from opposite sides must agree about where its nose is. A shared model is how they agree.
- Does the object or the projector move during the show? Anything on a turntable, a tracked truss or a rebuilt nightly set needs geometry the software can recompute.
- Is the geometry too complex to align by eye? Ornate architecture, an organic sculpture, dozens of small facets. If you cannot point to four clean corners on a face, hand-warping will fight you.
- Does content need virtual lighting that tracks the real form? A shadow that moves correctly across a curved surface as a light source travels is a 3D render, not a warped video.
- Must you previsualise for sign-off? If someone is approving the look before the kit ships, you need a model.
One further test worth applying: how long will the map live? A one-night event rewards speed, and a hand-built map is fast. A permanent installation that will be re-serviced by someone else in two years rewards a model, because the model is documentation.
| Type A — object mapping | Type B — model-driven | |
|---|---|---|
| What the software holds | 2D surfaces, warps and masks | A 3D mesh plus a virtual projector |
| Needs a 3D model | No | Yes, and an accurate one |
| Runs on | Phone, tablet, laptop, desktop | Desktop suite or media server |
| Typical setup time | 30–90 minutes on site | Days, mostly before site |
| Projector moves | Realign by hand | Re-run calibration |
| Best for | Props, windows, vehicles, set pieces, single-projector installs | Facades, blended multi-projector shows, touring, previz sign-off |
Preparing Content for 3D Surfaces
This is where most 3D video projection mapping work is won or lost, and it is almost entirely independent of which tool you use.
Design against the map, not a blank canvas
Calibrate first, then export the finished map as a PNG template and open that in After Effects, Photoshop or whatever you compose in. You now have the exact traced outline of every face at the exact pixel positions the projector will use. Build inside those outlines and your edges land on real edges. Design first and warp afterwards, and every straight line in your artwork arrives slightly bent. SurfaBeam's Map Export to PNG exists for precisely this handoff, and it is a Pro feature for that reason.
Sell depth with light, not with rendered geometry
A projector adds light; it cannot remove it. Whatever the surface reflects is your floor, so true black in your content means "leave this area as the object already looks", which is the most useful tool you have. Pick an imaginary light source, shade each face consistently for it, and let a hard highlight run along a real corner. A crisp bright edge sitting exactly on a physical edge reads as depth immediately. A beautifully rendered bevel two centimetres off the real one reads as a mistake.
Surface colour matters as much as lumens. A matte white or pale grey object gives you contrast for free; a dark, glossy or textured one eats it. If the object can be painted or primed, that is usually worth more than upgrading the projector. Around 2,000–3,000 lumens is comfortable indoors with the lights down; outdoors, plan on 4,000–6,000 and expect ambient light to set the real ceiling.
Delivery format and looping
Export as H.264 MP4 at the projector's frame rate and at the map's resolution. Exotic codecs stutter on the machine you brought, and stutter reads as failure even when the alignment is perfect. If the piece runs unattended, check the loop point on the actual projector before the doors open: a one-frame gap you would never notice on a laptop preview becomes a visible flicker at three metres wide. Content in our beginner's walkthrough covers the same handoff with screenshots.
Calibration: The Part That Decides Whether It Reads
Calibration means making the software's idea of the object match the object. In Type A that is your warp and mask work. In Type B it is solving the projector's pose against the model. Either way it is the step people rush and then blame the software for.
Some practical habits that survive both workflows. Lock the projector mechanically before you touch any software — tape the tripod legs, mark the floor. Turn off keystone correction on the projector itself; it throws away pixels doing badly what the software does well, and it fights your map. Get as close to perpendicular to the dominant face as the room allows, because a steep angle spends resolution on the far edge and no amount of warping buys it back. Photograph the finished setup from the projector position and from the audience position, so a bump at 6pm can be recovered against a reference rather than by memory.
Then check from where the audience will stand. Only one of those two views is being judged, and it is not the one behind the projector. Walk the arc, find the point where the illusion first breaks, and decide whether to fix it or to place a barrier there.
Map an object this week
SurfaBeam runs on macOS, Windows, Android and iOS with the same mesh warping, masking and multi-surface toolset on each. Free to start — full mapping, media, effects, tracking, visualizers and Timeline.
Where SurfaBeam Fits — and Where It Does Not
Here is the boundary, stated plainly, because this is the section that matters if you are weighing us up. SurfaBeam is a Type A tool, and a thorough one: mesh warping, corner pinning, digital masking, multi-surface mapping so each face of an object gets its own geometry, MP4 and PNG import, touch- and sound-reactive effects, hand, body and object tracking, visualizers and a Timeline editor. On mobile, output goes over USB-C or Lightning HDMI, or wirelessly via AirPlay and Chromecast; on desktop the projector is simply another display. It runs on Windows, macOS, Android and iOS and iPadOS, with the same toolset on each.
What it is not: a 3D-model-driven mapper. You do not import an OBJ, place a virtual projector and solve a camera pose in SurfaBeam. If your job needs that — a blended multi-projector facade, a moving object, sign-off from a previsualisation — go to TouchDesigner, a suite with model import such as MadMapper, or hire a media server and someone who runs one weekly. That is a different product and we are not going to pretend otherwise.
The genuine advantage of the mobile side is the walk-around. Standing at the object with the controls in your hand removes the adjust-at-laptop, walk-over, look, walk-back loop, and on an irregular object that loop is most of your setup time. Most people end up using both: build the map and cut content on desktop where there is a keyboard and a big screen, then take a phone or tablet to the venue for the calibration pass. If you are comparing against iOS-only options, our Lazy Lighting alternatives piece covers that end of the market.
On free versus paid: the free version includes the full mapping, media, effects, tracking, visualizer and Timeline toolset, so you can judge whether the object work holds up before paying. It watermarks the projected image and exported video, shows an entry gate before mapping (subscribe, or watch a rewarded ad on Android), and does not save or load project files. Pro removes the watermark and the entry gate and unlocks Save, Load and Export — including the Map Export to PNG you need for the After Effects handoff described above. On Steam the base app is free and Pro is a one-time DLC rather than a subscription.
Frequently Asked Questions
What is 3D projection mapping software?
The phrase covers two different things. Most of the time it means software that maps video onto a three-dimensional physical object — a statue, a car, a stack of boxes — by warping and masking a separate 2D surface onto each visible face. Less often it means model-driven mapping, where the software holds a 3D mesh of the object and a virtual projector, and renders the image from that virtual camera so it lands correctly on the real thing. The first is ordinary mapping applied carefully. The second is a distinct workflow that needs an accurate model, a desktop suite and a calibration step.
Do I need a 3D model of the object to do 3D projection mapping?
Not for most jobs. If the object has flat or gently curved faces and the audience views it from a limited arc, you can map it by eye: one surface per face, corner pin, then mesh warp where it bends, then mask. You need a model when the geometry is too complex to align by hand, when several projectors must agree on the same object, when content has to be rendered with virtual lighting that tracks the real form, or when you must previsualise before you ever reach the site.
Can you do 3D projection mapping from a phone or tablet?
You can do object mapping from a phone or tablet, and it is often faster than a laptop because you can stand at the object while you adjust. Mesh warping, corner pinning, masking and multi-surface mapping all work on mobile, and SurfaBeam runs the same toolset on Android, iOS, macOS and Windows. What you generally will not find on a phone or tablet is true model-driven mapping with an imported mesh and a virtual camera; that stays with the desktop suites and media servers.
What is the difference between 3D projection mapping and normal projection mapping?
Normal projection mapping treats the surface as a flat plane you correct for: you warp a rectangle until it fits. 3D projection mapping deals with an object that has depth, so it has multiple faces at different angles and distances, edges that must stay dark, and areas hidden from the projector entirely. Practically, the difference is that you build several independently warped and masked surfaces instead of one, and you accept that the illusion only holds from a limited range of viewing positions.
How do you make content that looks 3D on a projected object?
Design it against the calibrated map rather than against a blank canvas. Export the finished map as a PNG template, bring it into After Effects or a similar tool, and build every element inside the traced outlines so edges land on real edges. Then use light rather than geometry to suggest depth: shade the faces that turn away from your imagined light source, keep true black where you want the object to disappear, and let a highlight run across a real corner. A crisp edge on a real edge sells depth far better than a rendered bevel that misses the surface by two centimetres.
More questions of this kind are answered in our projection mapping FAQ, every panel and gesture is documented in the SurfaBeam user guide, and new tutorials go up regularly on the SurfaBeam blog.
Try it on an object you already own
Install SurfaBeam on the machine you already have — macOS, Windows, Android or iOS — point a projector at a stack of boxes, and build a face-by-face map in an evening. The free version includes the full mapping, media, effects, tracking, visualizer and Timeline toolset, so you can judge the geometry work properly before paying anything.